PHOTO: Courtesy Nilex, Inc.
You’ve set foot on a pristine plot, standing with your architect, imaging what a house here might look like. A Cape Cod with a pitched roof and end gables? A Craftsman with stone detailing and a bay of double-hung windows? Then, a realization: Before that home can happen, you’ve got to think about drainage.
Yes, erosion control is a buzzkill. It’s an extra expense, too. What’s more, if you’re subbing out this responsibility, you’d better hire someone who knows what they’re doing. One dirty street and the EPA could show up for a site inspection, penalizing you for paint leaks, a gas spill, or mud on the sidewalk.
Stormwater and erosion control regulations are expanding their reach in the building industry. Now, even some remodeling programs have them. A growing number of green certification programs, like GreenStar that began in Minnesota, include stormwater prescriptions for most remodel projects. Construction sites fall under stormwater regulation because they’re considered a point source for potential pollutants. As codes change and environmental regulation becomes stricter, water management is all the more important. Here’s how to make a good drainage plan.
Identify potential pollutants.
“A builder needs to have an understanding of what a pollutant is, because if you don’t know what it is, you can’t contain it and you can’t comply with regulations,” says Carrie Powers, a certified municipal separate storm sewer system specialist and principal at CP Compliance. While managing chemical agents or paint are obvious compliance measures, even dirt leaving the site through erosion or runoff after a rainstorm are considered pollutants by the EPA. You’ve got to pay attention not just to what you bring on to a site, but also to what leaves it—think erosion control and existing sediment. Here are factors to consider.
Site topography. The main pollutant that regulations are aimed at is soil carried offsite by stormwater. Your stormwater plan’s main job should be to keep soil on site and out of waterways. Make note of any natural pathways for runoff on your site, and what potentially could cause discharge.
Materials brought in and out. Any types of fuel, paints, and concrete are common offenders. Are any of these leaking? Are brushes being washed out in a non-certified area? A safe bet is that anything you need a material safety data sheet for needs to be contained.
Staging area. Are materials in the staging area covered? Are they stored on a non-permeable surface, in case there is a spill?
Make sure that your stormwater strategy dovetails with a drainage plan.
Best management practices (BMPs) are the enforcers and guardians for a stormwater plan. A well-conceived drainage plan allows for changing demands of the site. BMPs for small sites include the following:
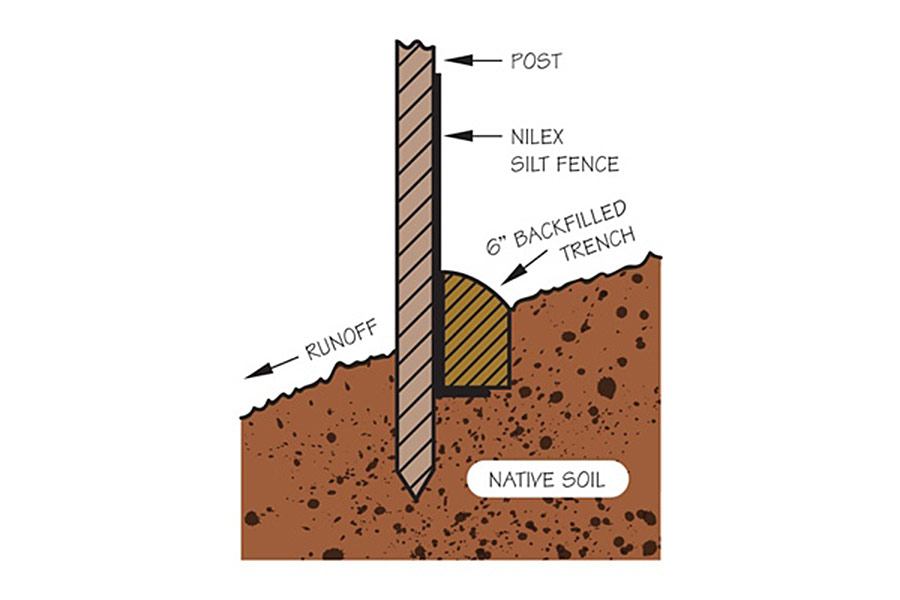
Silt fence:One of the least expensive solutions out there, silt fence serves as a linear or perimeter control whose primary function is to control sediment. The non-permanent solution features staked, woven geotextile fabric anchored in the ground
Inlet protection: If your building site is near an inlet, you’ll be required to protect it. There are a variety of approaches, such as rock wrapped in chicken wire or synthetic rock bag surrounds, depending on your local jurisdiction
Fiber roll or sediment control log: Fiber roll offers low profile, linear control for sediment. There are many different perimeter controls on the market; these are made of straw, coir, or excelsior wrapped in bio- or photodegradable netting.
Vehicle tracking pads:The goal is to have a designated entrance in and out of site that doesn’t turn into mud-hole and track dirt onto the road. The pad is usually lined with fabric or rock.
Concrete washout area:Depending on what the municipality allows, washouts run the gamut, from a simple pit in the ground to a delivered container unit on site. This is the designated place for concrete and paint to be washed out and contained, protecting the site and any adjoining lots from contamination.
Enlist the inspector as an ally.
You can stay out of trouble by partnering (instead of butting heads) with the inspector. Approaching the regulator with a team mindset also means staying ahead of ever-changing enforcements.
Walk the site with your inspector. Enlist his or her help so you can get it right. Understand that on-site inspectors are in the middle: They’re both regulators and are subject to regulatory enforcement themselves. The inspector is there because the city wants to avoid getting in trouble with the state for enforcement, and the state has accountability at the federal level. “Sharing goals means the inspector can tell you what they’re seeing, and will help you come up with solutions. You’re both accountable,” Powers stresses.
Get your paperwork in order. That inspector evaluating your site is looking at three main categories for compliance: sediment control, erosion control, and paperwork. Of those three, paperwork can be the biggest headache.
The secret is to keep track of the details. On an active jobsite there will be changes and corrections to your document. If anything changes, be sure you record it. Make changes to the map when new materials are brought in. The inspector wants to see items corrected and a noted history of activity on the site.
Amanda Voss, MPP, is an author, editor, and policy analyst in Denver. She has served on the board of Energy Literacy Advocates, spent six years in residential construction, and has taught AIA classes on fenestration.
Learn more about markets featured in this article: Denver, CO.