It’s such a simple concept: Take a wall and spill water over it.
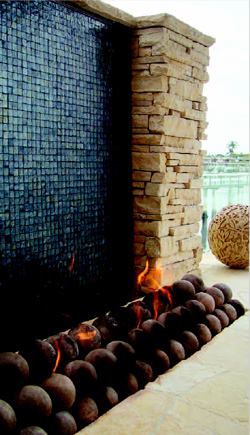
This basic idea gives wet walls, also called water walls, a singular beauty. The sleekest examples feature polished black stone with a thin film of water clinging to the surface like a glass tabletop. Other versions use rougher surfaces to create a more active, white-water effect.
For a wet wall to look great and function properly, you need to start with the right design, materials, and hydraulics.
The Wet. Water walls require relatively low flows and velocities. The water can come from a source placed at the very top of the wall or through a groove just below any coping-type cap you may use.
You can construct the water source yourself, or use pre-manufactured equipment made for sheet waterfalls. Some balk at the price of this hardware, but others believe the benefits outweigh the costs. Not only is such equipment easy to install, but it’s already waterproof—always a concern with water features.
Sargent orders a unit without a lip for the water to spill over. It just has a straight throat. He sets the stone or tile right to the bottom of the water feature hardware to act as a weir.
If you prefer to construct the water source yourself, there are a couple of ways to handle it. First, you could replicate the sheet-waterfall-hardware concept by cutting a slit into a pipe and embedding it into the wall.
Or you could form a basin at the very top of the wall to feed water over it. The fluid wells up, spills over the rim, and runs down the water feature. This tiny vessel can be built into the wall or made of a piece of pipe cut in half and suspended inside it, if it’s hollow. With this placement, water covers every inch of the wall’s height, and the plumbing and hardware are concealed, as long as the structure is tall enough that you can’t see the top.
When using this set-up, it’s important to ensure that the water is virtually free of turbulence as it spills over the rim and glides downward. This is especially critical if you want that smooth, polished effect. Water should slowly enter the source pool from the bottom so that it can calm down before spilling over the rim. Avoid pointing the feed pipe straight up. If possible, use elbows to direct the water toward the floor of the trough. Make the small basin at least 3 to 4 inches deep so any turbulence can dissipate before reaching the surface. Some builders make this trough out of a large pipe—6 inches or more—cut in half. Note that when using PVC pipe, there is the added advantage of it not growing algae.